Master Data > Forwarding > Tracking Templates
The Tracking Templates Application enables users to maintain Tracking Templates.
These templates define:
- To which shipments a tracking plan should be applied
- The milestones a tracking plan should contain,
- Under what conditions these milestones are considered completed,
- Which actions to execute for a milestones to reach completion.
- Alerts to be issued when unexpected events occurs in a tracking plan.
This application is intended for experienced users who are familiar with tracking events and with EDI communication in Scope. Please read the introduction to the application Shipment Tracking Monitor and how tracking plans are presented there first to familiarize yourself with the basics.
Overview of Tracking Templates
The overview displays all the tracking templates that have already been created. When a tracking plan in the overview is highlighted, the Applicability window at the bottom of the screen will show the order attributes used to apply the template to the correct shipment.
Make a new Tracking Template
There are a number of ways to make a new tracking template but the 2 easiest methods are:
- Standalone Template - this will let you create a template from scratch
- Copy an existing Template - Please reach out to your local Riege Support if you wish to make a copy of an existing template.
Defining when to apply a Tracking Template
A tracking template can be very general or it can be very specific, or anything in between. The Applicability tab of a template is used to define when the template must be applied to a shipment.
If you have a specific problem regarding a tracking template, please look at our article on priority of tracking template filters:
How can I prioritize some tracking templates to be applied to a shipment, and how can I disconnect an incorrectly assigned tracking plan?
Examples
A generally applied Tracking Template
In the example below, this tracking template will be applied to any shipment where...
- the method of transport is Sea.
- the import agent is Global Transport Logistics in New York.
- the type of shipment is a house FCL or a Single FCL (note a single FCL shipment may have more than 1 container on it).
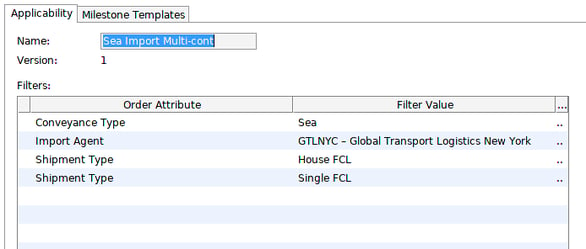
The above template will only be applied when a more specific template cannot be found.
A customer specific Tracking Template

The applicability of the tracking template above looks very similar to the above general tracking template except that the customer is specified as "Amri Incorporated". This means that this template will be applied to sea import FCL shipments when...
- the method of transport is Sea.
- the import agent is Global Transport Logistics in New York.
- the type of shipment is a house FCL or a Single FCL (note a single FCL shipment may have more than 1 container on it).
and
- The customer on the shipment is Amri Incorporated.
There are many order attributes that can be used to make tracking templates very specific.
Creating the Milestones for the new Template
Every shipment has a life-cycle from Pickup to Delivery. This life-cycle is made up of a series of legs and you can define milestones within each leg. The first leg is the pickup, and for this leg we might define the following milestones
- Issuing the pickup instructions to the trucker
- Receiving confirmation of the pickup by the trucker
- Confirmation of delivery by the trucker to the export terminal
Depending on the type of shipment that the tracking template is being applied to we could define all these milestone for the pickup leg, or just some or them, or none of them.
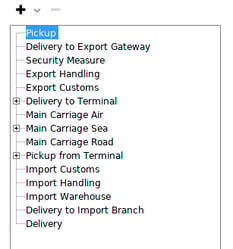
Below is shown the complete set of legs than are available for every shipment. Milestones can be created for each of these legs as desired.
Adding a milestone to the Pickup leg
In this example we will create the milestone Pickup confirmation for the pickup leg.
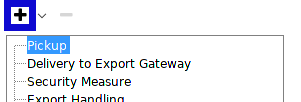
- Highlight the leg Pickup and click the "+" symbol.
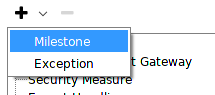
- From the sub-menu choose Milestone.
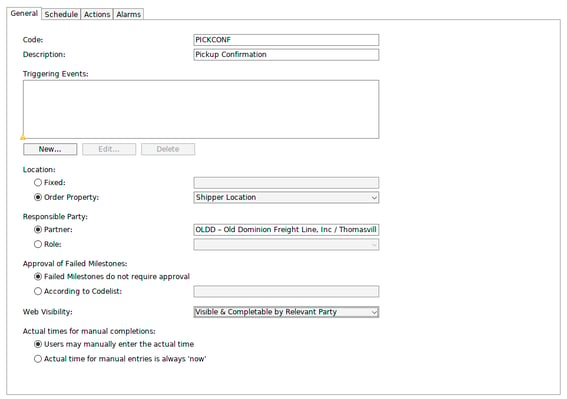
Completing the general elements of the milestone
The first tab of a new milestone is the general tab and this is where we define the basics of the milestone
- Code - This is the short code for the milestone. Our example is "PICKCONF"
- Description - The full description of the milestone, ie. "Pickup Confirmation"
- Triggering events - A milestone can be completed automatically, for example if the trucker can electronically transmit his pickup event to us, we could use this to automatically complete the event. In this case the trucker cannot do this and it will therefore be manually completed, so this field is left blank.
- Location - We need to specify where the milestone will take place in order to apply the correct time-zone to it. In this case the pickup will occur at the shipper's location.
- Responsible party - here we define who should complete this milestone. In this case we expect the trucker to notify us by logging into Connect and completing the milestone for us there.
- Approval of failed milestone - most of the time when a milestone in not completed on time it is sufficient alert the user, but some milestone require very close control and for advanced users a codelist can be created to control failures.
- Web Visibility - Sometimes we need to make the milestone visible in Connect. This field allows the user to choose the kind of visibility of the milestone in Connect:
- Invisible
- Visible
- Visible and completable
- Visible and completable by responsible party
- Actual times for manual completions - Either the current time may only be used or the user may choose a completion time.
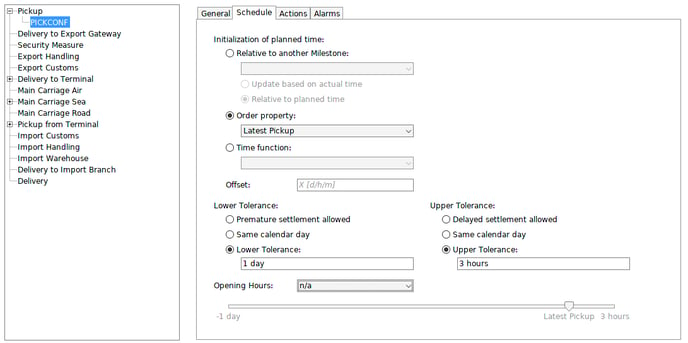
Completing the schedule of the milestone
The second tab of a milestone in the "Schedule" and here we define when we expect the milestone to be complete, the earliest to the latest times this may occur.
- Initialization of planned time - There are three ways to set when a milestone must be completed
- Relative to another milestone - this method looks at an already existing milestone and calculates based on the completion date of that milestone
- Order property - Here a date belonging to the shipment is used. In this example the "Latest pickup date" recorded by the user in the shipment will be used to fix the expected completion date and time
- Time function - this is the shipment creation time.
- Offset - The offset can be used to push the completion date and time to before or after a known shipment date and time. For example the completion of the pickup may be relative to the ETD of the vessel and therefor the offset could be use to specify that the completion of the pickup must occur 72 hours before the ETD of the vessel
- Lower Tolerance - here we can define how early the completion can occur. In this example the completion of the pickup is relative to the latest pickup date recorded in the shipment. "1 day" in the example means that the earliest we expect the pickup to occur is 24 hours prior to the latest pickup date and time.
- Upper Tolerance - here we define how late the completion may occur. The example below allows 3 hours after the latest pickup date and time recorded in the shipment.
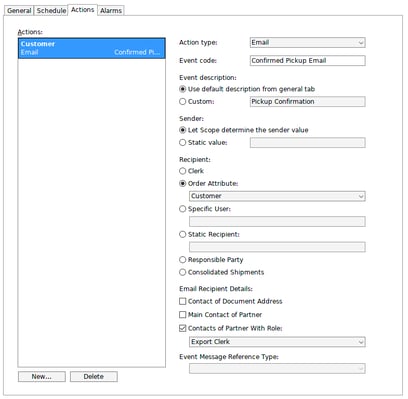
Creating Actions associated with completion of a milestone
When a milestone is completed, there are actions that can be automatically executed. The "Actions" tab of a milestone is used to create these and multiple actions can be created for a single milestone.
- Action type - The most common type of actions are:
- Send an email notifying someone that the milestone is completed
- Notify the user a milestone has been completed
- Event Code - this field can be used to give this action its own event code
- Event Description - here we can define if the description of the milestone is sufficient, or by using the custom description more specific information about the event can be used.
- Sender - here we can define who the alert should appear to be originating from
- Recipient - depending on the type of action, various methods can be used to specify who is the recipient of the action. In the example below, the action will send an email. To ensure the correct recipient gets the email we can choose from:
- Clerk - this would send the email to the user who currently owns the shipment
- Order attribute - here we can choose from list of parties who are associated with the shipment. In the example our email will go to the customer who the shipment belongs to
- Specific user - Use this field if the email should go to a specific user in Scope or a Scope partner.
- Static Recipient - This field is used if the recipient is a specific unchanging email address. Attention! No validation or plausibility check is performed.
- Responsible party - this would send an email to the party responsible for completing the milestone
- Email recipient details - this section allows us to be even more specific as to who should get the email notifying them of the action. In the example, the customer who the shipment belongs to is getting the email, but we are specifying that the customer contact with the role "Export Clerk" must get the email.
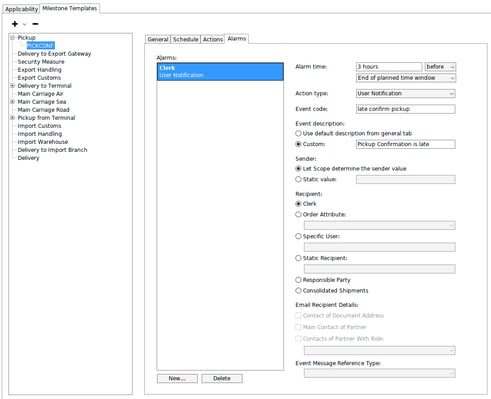
Creating milestone alarms
Just as actions may be created when a milestone is successfully complete, alarms may be created for milestones when failure of timely completion appears imminent. Multiple different alarms may be created for a single milestone.
Below, using the "Alarms" tab of the milestone, an alarm has been created for the "Pickup Confirmation" milestone:
- Alarm time - here we have specified that this alarm must be triggered 3 hours before the the end of the allowed time window. This should allow time to contact the trucker and ensure he is on his way to the pickup.
- Action type - here we specify what the alarm should do. We have chosen to send the user a Scope notification
- Event Code - a specific code for this alarm. This will default to the code of the milestone and this can be retained if preferred
- Event description - a full description of the event. This will help the recipient immediately understand the problem
- Sender - the party who should be appearing to send the alarm
- Recipient - as with actions, there are numerous options to ensure the correct party gets the alert. In this case the user responsible for the shipment will get the alert
When all 4 tabs of the milestone are complete, work can begin on defining the next milestone.
Click Save when all the milestones for a tracking plan are complete.