A Pre-Alert contains details of an Air Cargo or Sea Cargo Shipment, which ordinarily has been created from the Export Agents immediately before the export of the shipment.
The Export Agent or the Sender is able to handle the Import Agents by creating the Pre-Alerts at Scope Connect long before arrival of the shipment, information. These Pre-Alerts can be also converted by the Import Agents in Scope into a shipment, which saves time and exactness improved.
(Jump to topic)
How to create an Air Pre-Alert
How to create a Sea Pre-Alert
How to consolidate House Pre-Alerts to a Master Pre-Alert
How to convert an incoming Pre-Alert at Scope into an Import shipment
How to create an Air Pre-Alert
- To initiate a new Pre-Alert, click on the + New Pre-Alert button.
- Select the type of pre-alert (Other or Master)
The following example will be an Other, so any kind of shipment without a Master. - Enter the Shipper and Consignee details. You can use an existing address or a one time address.
Shipper's Reference
You may add a note of the carrier if available. If there is more than one note, separate them with a decimal point. This notes will be transmitted to the shipment.Origin
This is the place or airport, where from the goods come originally. You can add the name of the town, airport or code of the harbor to insert the correct origin.Export Agent
Here the Export Agent will be stored who is responsible for the Pre-Alert. There are only Export Agents allowed which are assigned to the regarding Scope Connect user at his user profile. Usually is of the Scope Connect user an employee of the agent who is selected.Consignee and Consignee Reference
Here applies the same method as for the Shipper.Destination
This is the destination harbor or airport of the shipment. Start typing the name or code of the harbor or airport to find the correct destination.The number of the successful searching results is indicated on the right and is able with a click on the dropdown list indicated and the desired harbor or airport can be selected.
Notify
Here you can add a notify to the Pre-Alert. Add a One Time Address. - Click Next > to proceed to page 2 (Main Transport).
Main Transport (page 2)
The Main Transport Screen open and the first step is to choose the means of the transport Air or Sea. For this example, we take Air.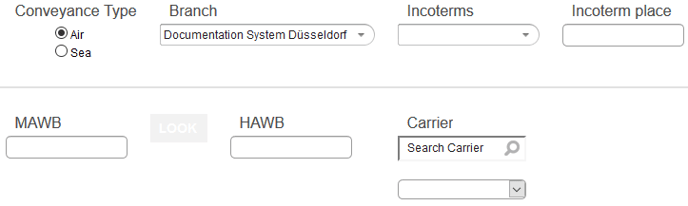 Branch
Choose the branch where the Pre-Alert will be sent (drop-down).
Incoterms
At Incoterms start writing at the regarding field or use the arrow key to choose an item.
Incoterm Place
Here you can take the correct Incoterm place.
MAWB
If the MAWB is already known, you can enter it here.
If it is a House Shipment and the MAWB number is not known, just leave the field blank.
The MAWB will be filled automatically, when the shipment will be consolidated to the Master.
HAWB
Here the HAWB of the Air Pre-Alerts will be inserted.
Carrier
Please insert the Carrier of the transport. You can insert the name of the airline, the two digit airline code or the three digit AWB prefix.
Add flights to an Air Pre-Alert
If the flights of an air export shipment are known, you can add them to the Pre-Alert.If you create a Pre-Alert for a House shipment, the flights will be overwritten by the Master Pre-Alert as far as the House will be consolidated to the Master.
- To add a flight, click the Add button.
- Now you can add the details of the flight.
- Click Add, if you have finished the entry. The finished Main Transport could be like the example below. To add more flights, repeat the steps above.
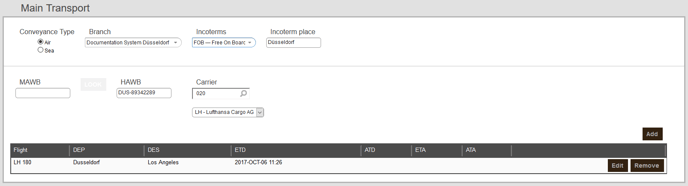
- Click Next > to go to step 3: Loading.
Loading (page 3)
On page three, cargo information can be entered.
The shipment details can be added as a simple list, or detailed packing can be provided.
Simple pack list
| Field | Description |
| # of pieces |
Record the total number of pieces here. |
| Total weight | Total weight is entered here. |
| Total volume | Total volume can be added here. |
| Nature of goods |
Summary of goods can be added here. If the goods are DGR goods, use the checkbox DGR- Dangerous Goods |
Detailed pack list
| Field | Description |
| # of pieces |
Record the total number of pieces here. |
| Nature of goods |
Summary of goods can be added here. |
| Type |
Add the packing type. This can be selected from the drop-down menu. |
|
Length, width, height |
Detecting the dimensions of packages. |
|
Volume |
The volume is calculated from the dimensions previously entered. |
|
Total volume |
The total volume is calculated from the dimensions previously entered. |
|
Weight |
Add the weight per item. |
|
Total weight |
The total weight is automatically calculated according to the weight and number of pieces. |
+ Add
By clicking + Add, the entered details are transferred to the packing list.
Below, you can see an example of added packages. You can Edit or Remove them by clicking on the buttons. If you finished the entry of the goods for the Pre-Alert, please click the Next > button to get to the next step: Documents.
Supporting Documents (page 4)
If you want to add additional documents, for example a commercial invoice, to the Pre-Alert you can do that in the screen Supporting Documents by clicking on + Add Document.
Next > button will bring you to the final step Overview and submit.
Overview & Submit
The last step shows with an overview of all added information of the current Pre-Alert.
Each step can be edited again with the regarding buttons Edit step x.
Pre-Alert Now
Will complete the Pre-Alert and send it.
Keep Open
If you don't want the Import agent to see the Pre-Alert, please click this option.
How to create an Sea Pre-Alert
First steps and page 1 are identical to the Air Pre-Alert procedure.
Main Transport (page 2)
Choose Sea in the Conveyance Type section, then add all necessary info.
Branch
The branch will be shown, where the Pre-Alert will be sent to.
Incoterms
At Incoterms start writing at the regarding field or use the arrow key to choose an item.
Incoterm Place
Here you can take the correct Incoterm place.
If the OBL is known, you can add it. If it is a House shipment, which already doesn't have a OBL, you can skip the regarding field empty. The OBL field will be filled automatically if the shipment will be consolidated later to a Master.
HBL
Add the HBL at the Pre-Alert
BookingNr.
If the Liner Agent provided a booking number for the shipment, you can add it here.
Carrier
Add the Carrier, which will transport the shipment. You can enter the name of the carrier or the four-digit SCAC code. Scope Connect will search the correct carrier.
Tour
You can add one or several voyages to the Pre-Alert. Click the Add button on the right. Complete the following fields and then click Add again to add the tour to the list.
- Voyage Number
- Vessel
- Port of departure
- Port of destination
- ETD of the voyage
- ATD of the voyage (if known)
- ETA of the voyage
- ATA of the voyage (if known)
If all details for the voyage are complete, click the Add button again to create an entry in the list. For another voyage, click Add button and the fields will show up again.
To proceed to the next page (Loading, 3), click on Next >.
Loading (page 3)
There are two ways to add the specifications of the goods (each for LCL and FCL):
- Simplified Input - this is a simple total of all the goods and an overall description
- Detailed Packlist - Loose goods and container details - this is a detailed description of all the goods and the containers the goods are in
LCL Simplified Input, optional 1 Container
- Number of the goods, Gross Weight, Total Volume, Nature of Goods
- If DGR - Dangerous Goods - please click the regarding checkbox
-
Optional, you can add the following information to a container.
- Container Number - Scope connect verifies the container check digit.
- Unknown or Shipper's Owned
- Container Type - in this field, there is a list of the container types available. You can choose the correct type.
- Seal
- References
- Remarks
LCL Detailed Packlist, optional 1 Container
If you want a detailed packing list, you can add the following values:
- Number of the goods, Type - kind of package - can be chosen from a list of available packages, Nature of Goods, Goods can be stacked or not - relevant can be marked, Volume/Total Volume, Weight/Total Weight
- If DGR - Dangerous goods - please click the regarding checkbox
-
Optional, you can add the following information to a container.
- Container Number - Scope connect verifies the container check digit.
- Unknown or Shipper's Owned
- Container Type - in this field, there is a list of the container types available. You can choose the correct type.
- Seal
- References
- Remarks
FCL Simplified Input, 1 Container mandatory
Will have the same fileds as above LCL Simplyfied Input, 1 Container mandatory,
but here you can add goods by pressing the Add button.
FCL Detailed Packlist, Container mandatory
Here you can add information to several containers.
- Container Number - Scope connect verifies the container check digit, Unknown or Shipper's Owned, Container Type - in this field there is a list of the container types available. You can choose the correct type, Seal, References, Remarks.
If all container details are complete, click the Add button. 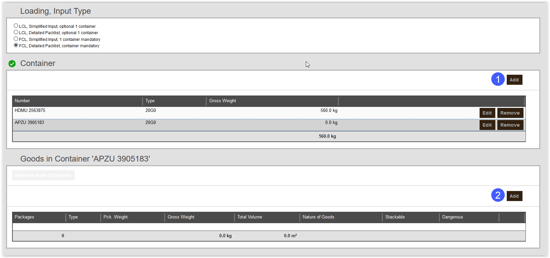
For additional containers, click on add (1).
For goods inside the containers, click the Add button in the goods section (2).
If all packing pieces/goods are added complete they will be shown with total numbers of the goods, total weight and total volume, and you can go to the next step Supporting Documents. Click on Next >.
Supporting Documents (page 4)
If you want to add additional documents, for example a commercial invoice, to the Pre-Alert you can do that in the screen Supporting Documents by clicking on + Add Document.
Next > button will bring you to the final step Overview and submit.
Overview & Submit
The last step shows with an overview of all added information of the current Pre-Alert.
Each step can be edited again with the regarding buttons Edit step x.
To fininsh the Sea Pre-Alert click Save.
Consolidation of a House Shipment into a Master
- Click on the + New Pre-Alert button.
- Choose the Pre-Alert Type Master.
- Shipper and Consignee
Shipper - here the Export Agent, who sends the Pre-Alert.
Consignee - here the Import Agent, who gets the Pre-Alert.
Export Agent - here the Export Agent, who sends the Pre-Alert.
Complete the place of Departure and Destination of the Master. - Click Next > to proceed to the next page (Main Transport).
- Depending on the type (Air or Sea), add the MAWB/HAWB or OBL and click the Search button to add already existing pre-alerts. Add flight or voyage dates if needed.
- Click Next > to proceed to the next page (Consolidation).
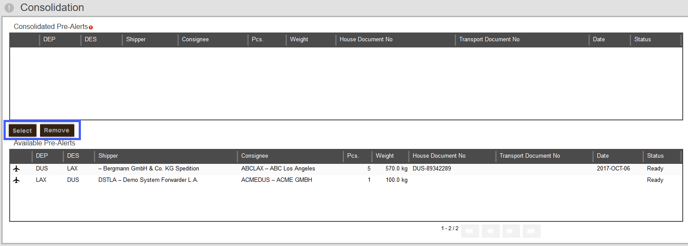
The screen Consolidation shows at the bottom all House Shipments which can be added to the Master Pre-Alert. This ones will be displayed as Available Pre-Alerts.Please mark the House shipments, which will be added to the Master and use the button Select, to add them to the Master. They will bew transfered to the upper part of the screen as Consolidated Pre-Alerts.
To remove a House from a Consol, mark the House at the window Consolidated Pre-Alerts and then use the Remove button.
- Proceed with Next > to Supporting Documents and again to Overview & Submit.
- If the Export Agent press the button Finish (Abschließen), to finish the Pre-Alert, the Pre-Alert will be visible instantly in Scope at Air- or Sea-Import Shipment overview.
Conversion of a Pre-Alerts into Scope Import
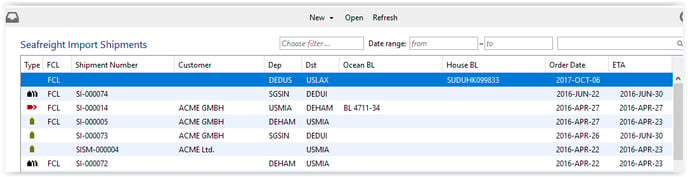
The follwoing example shows a Pre-Alerts, which is ready for the convertion to a Sea Import Shipment by the Sea Import Agent. You see that it is a Pre-Alerts because the fields "Type" and "Orderer" are empty.
The open Pre-Alert will (for example) look like this: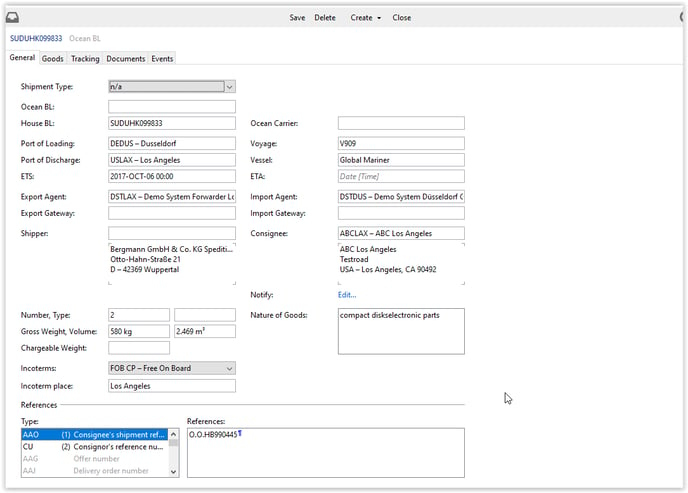 From the menu select Create > Shipment... to convert the Pre-Alert to a shipment.
You will be promted to choose the shipment type: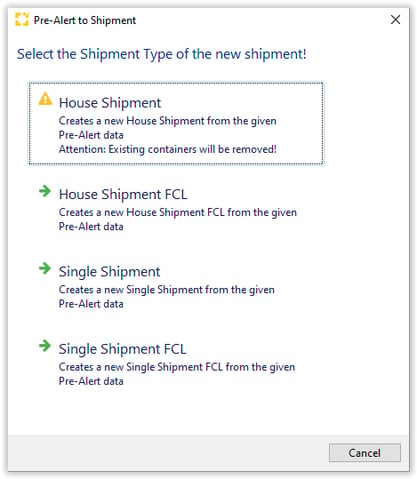
Once the Import Clerk converted the Pre-Alert into a shipment it is not any longer visible as Pre-Alert at Scope Connect but as a Shipment.