How can I process payables in Scope?
When a shipment is created in Scope, there will be costs associated with this shipment. See how costs are entered in Scope and processed so that these costs are paid and accounted, resulting in an accurate final profit/loss figure for the shipment.
Entering Costs - estimates
When the shipment is created, costs can be entered as estimates, this is also known as "protecting" the costs. These estimates are created because while an invoice for a cost is expected from the vendor, it may not yet be on-hand.
There are 2 ways estimate costs can be entered:
- Manually entered in the jobcosting tab of a shipment
- Automatically created by a cost tariff
Manually entering an estimate cost
- Open the shipment.
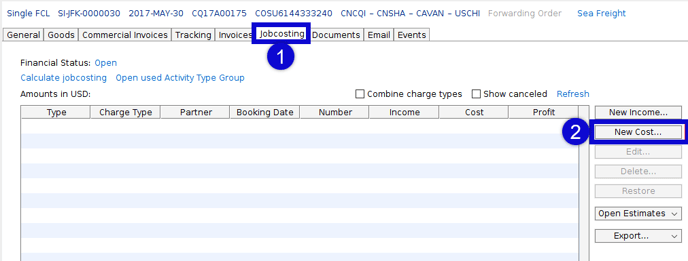
- Go to the Jobcosting tab (1).
- From the right hand action buttons select "New Cost..." (2).
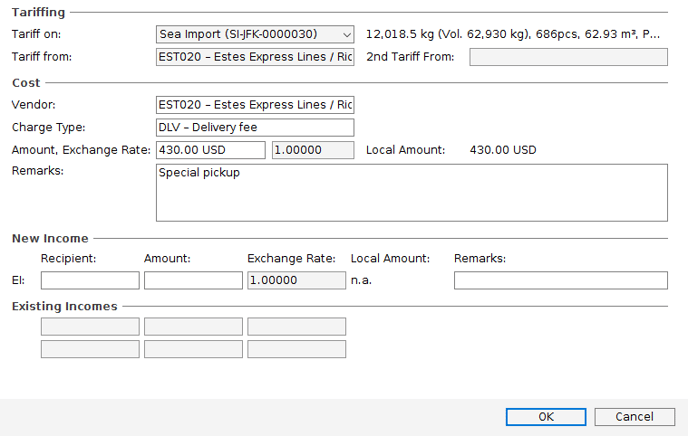
- Tariffing section - if there is a tariff that can be applied, it will automatically inserted
- Cost section - the following information about the cost must be provided, other fields are optional
- Vendor - the partner who will be billing for the cost
- Charge Type - the type of charge that will be billed
- Amount - the amount that will be billed
- New Income - details of any estimated income related to this cost - optional
Click OK when the cost details are entered and the Jobcosting screen will return. As shown in the example below, the new estimate cost appears as the type EP which means Estimate Payment. 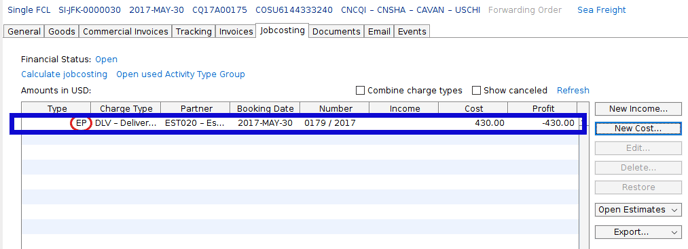
Costs created by cost tariffs
If a tariff exists for a cost and it applies to the shipment, then the steps above will be automatically completed by the tariff. There is a separate How-To on creating tariffs.
Converting the estimate payable to a confirmed cost
When the vendor, in this case "Estes Express Lines" sends their invoice finalizing the charge for the Delivery Fee, we must convert the estimate payment into a confirmed payment.
- Go to the Invoice tab of the shipment.

- Click on the New button at the bottom of the Invoices screen.
- From the drop-down menu, choose New Incoming Invoice.
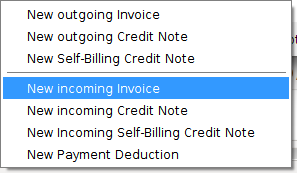
The Fast Incoming Invoice Entry will open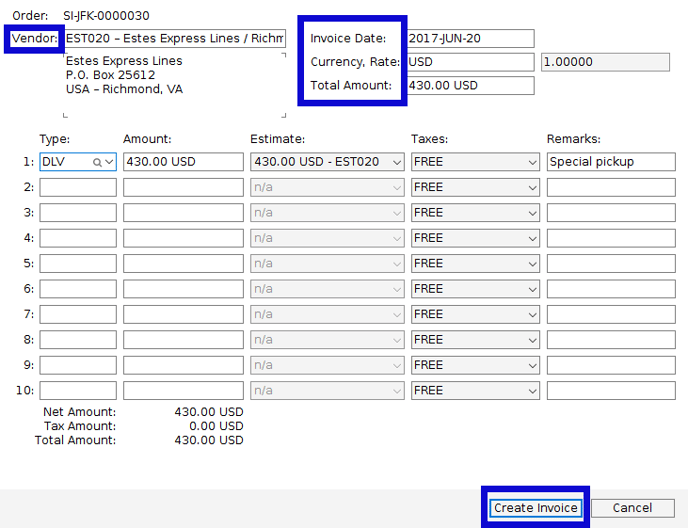
- Enter the following in the header of the order:
Vendor - The vendor address
Invoice Date - the date of the vendors invoice
Currency - This will default to the system currency
Total Amount - Total amount on the vendor's invoice
If the vendor's invoice has more than 1 charge line, these can be entered in the charge lines. At lease 1 charge line must be entered.
When the "Type" of charge is entered, Scope will try to match it to an amount already entered in the Jobcosting screen for this vendor. In this example, as soon as charge type "DLV" is entered, the figure of $430.00 is found in Jobcosting and automatically appears in the "Amount" field.
The total of the amounts entered in the charge lines must match the total amount shown in the "Total Amount" of the header, in this case $430.00. - When all details have been entered and the total of the charge lines and the total amount match, click Create Invoice at the bottom to finalize these charges.
Finishing the incoming invoice
The application Incoming invoice will open.
All the details previously entered will automatically appear in the new incoming invoice.
Only the Invoice No. needs to be entered. This is the vendor's invoice number.
Incoming Invoice options
- On Hold
If the incoming invoice needs to be checked and confirmed by a different user, then the user's name can be entered in the To be checked by field and any notes to this user about the invoice can be made in the Note field.
On clicking OK the incoming invoice will now change to an "Open Payable" in the jobcosting screen. This is type "OP".
When the user authorized to check the invoice, opens the invoice, the menu bar options will change:
The checking user must select Release to confirm the payable is good.
Once this is done, the Finish option is active. - Save
Use the save option to save all work done to-date on the incoming invoice. - Export
This option will open the incoming invoice as a spreadsheet. - Print
This option will produce a PDF copy of the invoice. - Finish
If the incoming invoice is correct and complete, click finish. The incoming invoice will now appear as an incoming invoice in the jobcosting, it will be type "P" (paid) and will have an internal invoice number. - Delete
If the incoming invoice has not been finished, it can be deleted to remove it. - Close
The close options will close the incoming invoice.
Creating Incoming Invoices outside of shipments
The process above describes creating and processing incoming invoices within a shipment. It is also possible to create an incoming invoice outside of shipment, this is especially useful when incoming invoices refer to multiple shipments.
Finance > Accounts Payable
The Overview of account payable will appear:
- From the menu bar choose New.
- Choose Invoice from the sub-menu.

The incoming invoice application will appear. This is the same as seen before.
When a new line is added to an incoming invoice, the New Chargeline application appears:
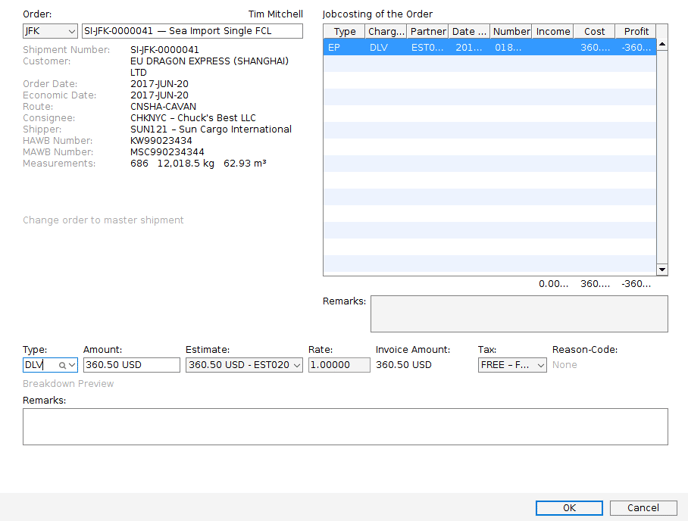
You can search for the shipment by entering the branch code and then typing the shipment number or some part of the shipment such as a partner name or address or vessel name etc.
Once the desired shipment is located, estimate payables on the shipment will appear in the right hand window called Jobcosting of the Order. This provides easy reference to the estimates on the shipment.
When a charge type is entered in the Type field, if this matches an estimate in the shipment, the amount is automatically populated from the shipment. Adjust this amount as required.
When complete, click OK and proceed to the next charge line.
