Accounting Settings
To activate this feature for an existing QuickBooks Online customer, the Payment module itself should be activated first.
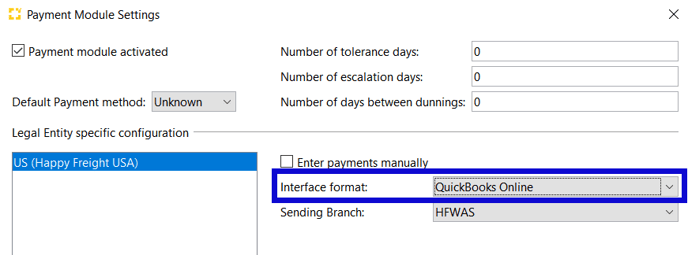
Finance > Payment > Maintenance > Settings and activate the Payments module for the legal entity (Check box). Make sure to select "QuickBooks Online" as "Interface format".
Using the Finance > Payments (Invoices) > Maintenance > Init action to add Payments for invoices that were already printed can be done, but with a downside.
Right now, we will not be able to get Payments from QuickBooks Online back to Scope when the 'lastUpdateTime' in QBO is older than 30 days.
So when using the Init action in Scope, this has to be taken into account, and a proper threshold date should be selected.
Otherwise there will be many entries for invoices that will not be closed by the payments synchronization.
Next steps
- After the Payment module has been activated, go to Settings > Finance > Accounting.
- There should be a new action link Payment Types with QuickBooks Online.
This can be used to link QBO's payment methods with the corresponding payment type values available in Scope.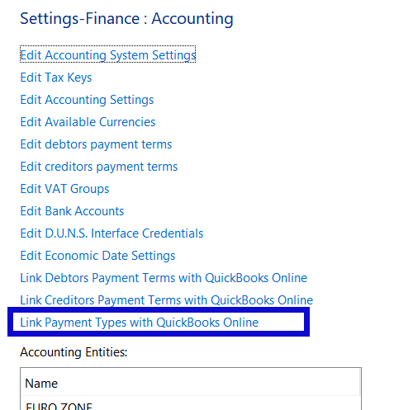
- When that has been done, use Edit Accounting System Settings, select the QuickBooks Online entry, then switch to the new Payments Synchronization tab.
- There you can activate (or deactivate, if it is already activated) the synchronization of payments between QBO and Scope.
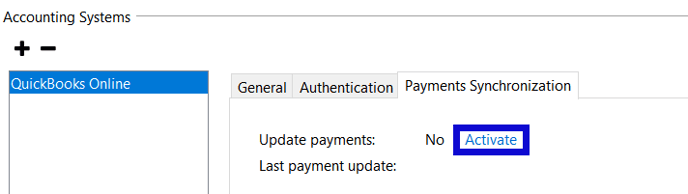
When doing so, you will need to specify the time point since when payments should be imported into Scope.
That timepoint will in the end be used by QBO to compared it against the 'lastUpdateTime' values of its Payments and BillPayments.
As a basic rule, the timepoint entered here should match the date chosen when an Init was performed in Scope's payment module.
If no Init was performed, the timepoint can just be left as its initial value.
5. After that, close the dialog with OK to store.
Payment Module Settings
Once the accounting settings are complete, enter the payment module details:
- From the Scope menu, select Finance > Payments (Invoices) ...
- In Payments (Invoices) select Maintenance > Settings from the toolbar-
- Make sure the Payment module activated checkbox is active.
- Choose the default payment method and the days allowed for "Tolerance", "Escalation" and days between dunnings.
- Make sure the correct legal entity is selected.
- Enter payments manually must be empty, this is only active if corrections need to be made to payments.
- Choose the correct format - QuickBooks Desktop or QuickBooks Online.
- Choose the branch that send the payments.