How to make use of the Exact Online interface?
The Exact Online interface is used to transfer relations and transactions from Scope to Exact Online and to transfer debtor balances (open A/R, and optionally open A/P) from Exact Online to Scope.
Period closing in Scope and Exact
Initially be sure that the last open period (See Last open month in Finance|Accounting in Scope is also open in Exact Online.

Please note that the Administration | Settings of Exact Online the "Period-date check"in the Exact Online settings MUST be set to No.

If you want to close a period so that Scope no longer books in that period in Exact, please adhere to the following procedure. It will prevent outgoing invoices, estimates
and purchase invoices to be booked into an old period.
- Close month in Scope in Finance|Accounting in the top bar: Month - Close month
- Run accounting interface batch in Finance|Accounting
- Import in the accounting package (first the relations, then the transactions)
- Close same period in the accounting package (at least for the journals used by Scope)
Export Relations and Transactions from Scope
See: How to export financial transactions and debtor/creditor changes from Scope
Import Relations and Transactions in Exact
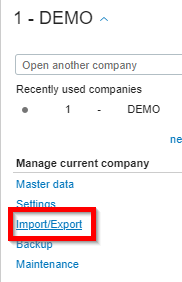
Login to Exact Online. On the top left, click on your administration number. Choose Import/Export.

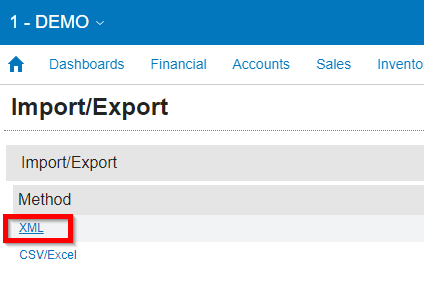
In the next screen choose XML.

1. Import Accounts/Relaties
First import Accounts/Relaties. This must be done before (!) importing the Transactions.
EN version:
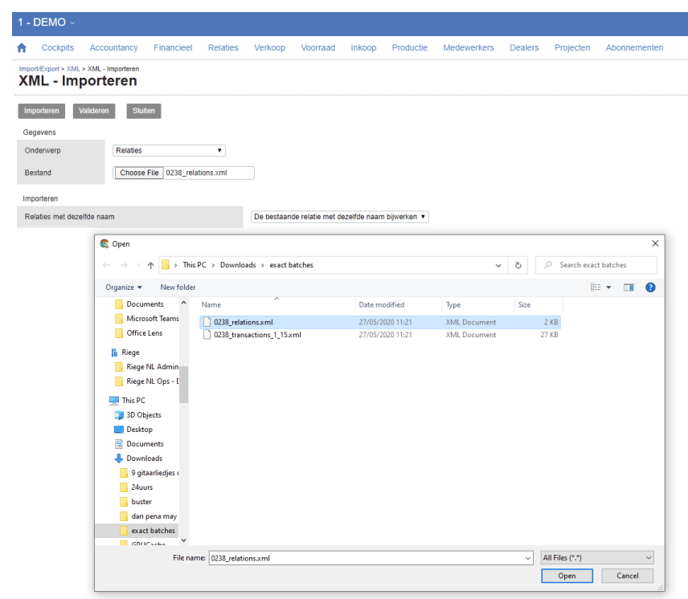
NL version:

After clicking import, select the relations.xml file that Scope produced.

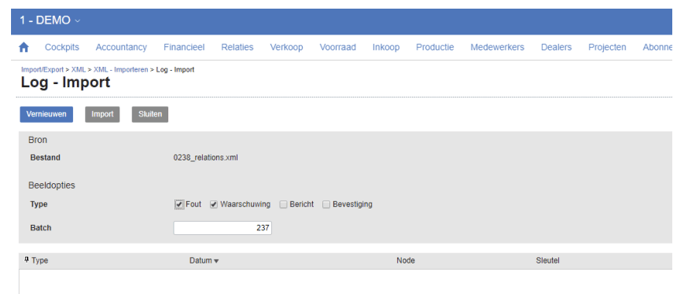
Select the path to the relations.xml file created by and saved from Scope. Choose Import to start the import process. Once you have done that, please check for errors and warnings by selecting Error/Fout and Warning/Waarschuwing and then press Refresh/Vernieuwen.

If any errors or warnings are shown on the screen, please contact your Riege service team so we can help you with the error or warning and see how it can be corrected and avoided in a next batch.
2. Import Transactions/Transacties
Select the path to the transactions.xml file created by and saved from Scope. Choose Import to start the import process. Once you have done that, please check for errors and warnings by selecting Error/Fout and Warning/Waarschuwing and then press Refresh/Vernieuwen.
If any errors or warnings are shown on the screen, please contact your Riege service team so we can help you with the error or warning and see how it can be corrected and avoided in a next batch.
If Scope generated more than one transaction file, make sure you repeat this step for every transaction file
Procedure from Exact to Scope
This procedure describes the steps for updating the outstanding debtor balance in Scope using the outstanding invoices from Exact.
Export debtor balances from Exact
Login to Exact Online. On the top left, click on your administration number. Choose Import/Export. In the next screen choose XML.
Select the Export option under Financial - Te vorderen / A/R.
Choose the option "Export(eren)", in the next screen, select Export(eren) again, in the next pop-up choose Next and then remember where the export AR xml file is saved on your system.
Export creditor balances from Exact
Optionally (in case you are using the Scope dunning module), you can repeat the same steps for the creditor balances by exporting de "Te betalen" / "A/P" option from the same Import/Export XML screen in Exact. This will create an AP xml file.
Import into Scope
If you make use of the additional Dunning module in Scope, Scope will calculate open balances by keeping track of the open invoices instead of open balances. If that is the case, the AR and AP files must be imported in the function Finance-Payments (Invoices).
If you do not make use of the Scope Dunning module, Scope will make use of the sum of the open balances per debtor. These balances can be updated from Exact using the following procedure. In Scope go to Financial / Accounting and use the option Import OB & Credit limit on top. Select the file that you exported/downloaded from Exact (Debtors: ARs_1.XML).
Once the AR file has been selected and then processed by Scope, the open balances of the debtors will have been updated. You can see that on the Debtor role of your Partners.
Open Balance (import): This is the amount last imported from Exact
Open Balance (invoices): This is the amount of invoices not interfaced to Exact yet (not included in an interface batch job yet)
Open Balance (total): Sum of the two above.
It is possible to e-mail the ap.xml and ar.xml files to Scope. Balances will then be updated in Scope automatically after receiving them e-mail with these files attached. If you wish to make use of this feature, please fill out the Service request form.
