- Click on Carrier Booking in the general tab of a sea export shipment.

- Most of the details from the shipment will be transferred to the carrier booking. Check these details and amend any that need changing. If there are mandatory fields missing that must be transmitted to the carrier, these will be clearly marked by the red error icon [
 ].
]. - Once all errors are resolved, the carrier booking should look similar to the example below:
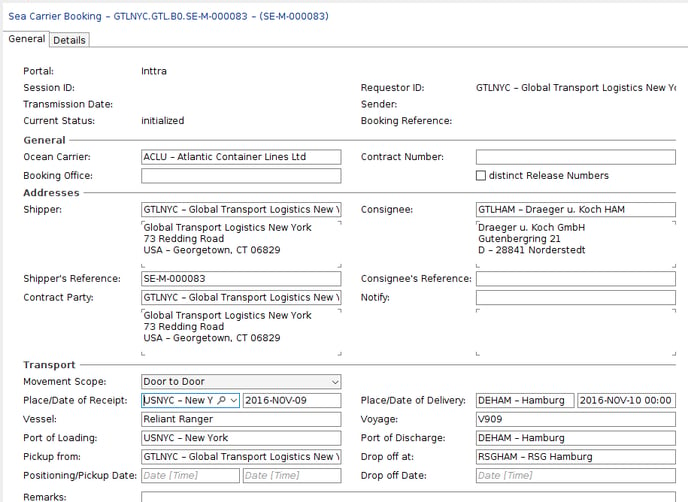
Optional: If you have a spot rate with the carrier, enter the spot rate number in the Contract Number field. - Use the menu bar options to save the booking or send it to the carrier via INTTRA.
If the carrier booking is saved but not sent, then it will be shown in the shipment general tab as initialized. ![]()
Booking Confirmation from the Carrier
Once the carrier booking is sent to the carrier via INTTRA, the carrier should respond via EDI and confirm the booking. When this response is received, which should occur very quickly, it will be shown in the general tab as Carrier Booking (confirmed).
![]()
When a carrier booking is confirmed, the "Main Carriage" details will be automatically updated by the carrier:
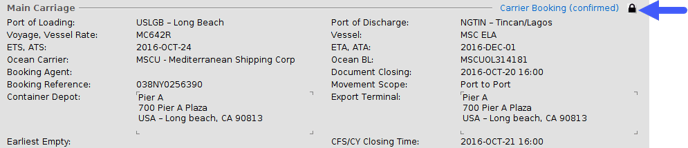 If it is necessary to make manual adjustments to these main carriage details, the click the lock icon to the right of the blue Carrier Booking (confirmed) link.
Amending or Canceling and INTTRA booking
Click on the Carrier Booking (confirmed) link to open it, then from the menu bar select, amend booking or cancel booking.
If you amend a booking, be sure to send it again to the carrier when ready.
Sending B/L instructions
Once the booking is confirmed by the carrier, B/L instructions can be sent to the carrier.
- On the general tab of the shipment, click the B/L instructions link.
-
Now complete the B/L instructions as normal.
- When the B/L instructions are ready to transmit, on the Preview tab of the B/L instructions editor, click the blue link Send shipping instructions. As per the screenshot below, when the carrier receives and these, a date and time the carrier confirmed will be shown.

NOTE
If you wish to include extra information on the B/L Instructions, like phone numbers for shippers and consignees, these must be added to the shipper and consignee addresses on the general tab of the B/L instructions editor. They should NOT be added to the preview. Information manually added to the preview is not sent to the carrier. Information added to the General and Goods tabs of the B/L instructions editor will automatically show up in the preview.
Carrier tracking information
Once a shipment is booked via EDI with a carrier, the carrier will automatically update the shipment with tracking events and these can be shown in the tracking tab of the shipment.